Contact form 7 is one of the free popular WordPress plugins to create contact forms or contact pages. The plugin allows you to easily create a simple contact form and place it anywhere on your site using a shortcode. On this page, I will show you how to use the additional settings of the plugin to create more customized contact forms that look more professional.
I’ll assume that you already have contact form 7 plugin installed & activated on your site, so let’s get started:
1. Create a Contact Form
On your WordPress dashboard, click on contact then add new. Give your contact form a name by clicking on the “untitled” and type a name for ex: “my contact form”, then click save.
There are 3 main parts to create a contact form with contact form 7 as shown in the screenshot below
- Part 1 (Form Section): To insert text and new fields into your contact form.
- Part 2 (Tags Section): To choose fields and options for your contact form.
- Part 3 (Mail Section): To customize the email that will be sent to you when someone fills in your contact form.

By default, contact form 7 will create a contact form with the following fields: Name, Email, and Message. If that all that you need then you can save the form, and use the shortcode directly to display the form on your site. You don’t have to change anything in the 3 parts, but don’t forget to enter your email in the (To:) field in part 3, this way all contact form data will be sent to your email.
2. Customize your Contact form
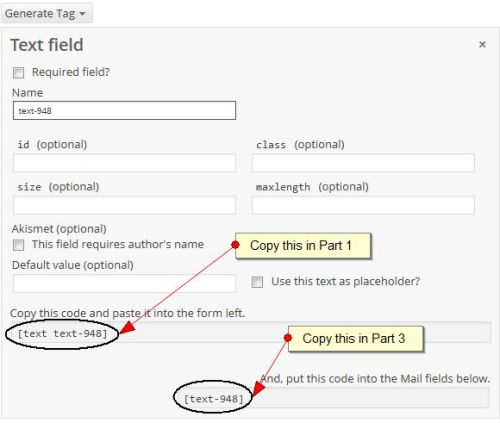
To start customizing your contact form, for ex: adding more fields, text area, file upload, Captcha ..etc. simply click on the drop-down menu in part 2, and choose the element you want to add, for example, I will choose the text field, then you should see something like this:

In the Name field, you can choose any name, this helps you recognize this element if you have created many fields for your contact form, however, this isn’t necessary, you can leave the created name as it is, in my case it’s: text-948. You will notice that if you change the name, the code will change accordingly.
To add this element to our contact form, we will need to copy the 1st shortcode, ex: [text text-948] into part 1, and copy the 2nd shortcode ex: [text-948] into the Message body of part 3. That will insert a new text field to the contact form and will allow the entry to be included in the email that will be sent to you.
Note:
- If you copy the 1st shortcode to part 1, and you forgot to copy the 2nd shortcode to part 3, the field will be added to the contact form but you will not receive the data submitted by users into that field because you didn’t include its shortcode in the mail section of Part 3, so always make sure you copy and paste both shortcodes.
- To make any field required, don’t forget to check the box near the “Required field?“
Now we have created a new text field and we have added it to our contact form and to the mail section, the next step is to add a text above that field in the contact form so users can understand what they’re supposed to enter into that field.
For example, I will use this text field to request mailing address from my visitors, so in part 1 I will write a new line of text “Mailing Address” just above the shortcode [text text-948], the final content in part 1 will be:
[box type=”shadow” ]
Your Name (required)
[text* your-name]
Your Email (required)
[email* your-email]
Mailing Address
[text text-948]
Subject
[text your-subject]
Your Message
[textarea your-message]
[submit “Send”][/box]
The same steps can be applied to add any fields to the contact form, by simply choosing the field you want to add and copy the 2 respective shortcodes into the form section part 1 and message body section part 3.
Example:
As an example, I’ve created a contact form with more fields to give you an idea of what’s possible with contact form 7 plugin.
Note: I have modified the text in part1 and part 3 accordingly.
Here is how my final form section (part 1) looks like:
[box type=”shadow” ]
Your Name (required)
[text* your-name]
Your Email (required)
[email* your-email]
Your Telephone
[tel telephone]
Your Website
[url website]
Choose a department
[select* department “Billing” “Technical” “Other”]
Subject
[text your-subject]
Your Message
[textarea your-message]
Attach File
[file Attachfiles]
[quiz quiz]
[submit “Send”]
[acceptance Acceptterms] Please Accept Terms of Service.[/box]
How my final mail section (part 3) looks like:
[box type=”shadow” ]
From: [your-name] <[your-email]>
Subject: [your-subject]
Telephone: [telephone]
Website: [website]
Department: [department]
Message Body: [your-message]
Attach File [Attachfiles][/box]
How my final contact form looks like:
Notes: To insert a Captcha to your contact form you will need to install really simple captcha plugin, however instead you can simply use the [quiz] tag in contact form 7, as I did in the above example, this will help reduce emails by spambots.
3. Publish your Contact form
To view and publish your contact form, save your contact form, then copy its shortcode and paste it where you want to display it. ( page or post). You create a new page that can be “contact us” page or “support” page or even an “advertise” page.
Test your contact form
Don’t forget to test your contact form by completing the form and sending a copy to yourself. If you receive an email with all the completed fields this means that you are good to go.


Hello. Do you own a marketing or advertising agency?
Please contact me here and I will get back to you asap.