The GetResponse email marketing platform is one of the most user-friendly platforms on the market. It’s perfect for small businesses, solopreneurs, and anyone who wants to start building an email list from scratch. If you’re new to GetResponse, this guide will give you a quick overview of how to get started.
Getresponse tutorial for beginners
Try Getresponse For Free
GetResponse has a large variety of features, including A/B testing, autoresponders, landing pages, and segmentation. It has one of the best free trials on the market. Sign up for a free-forever account and see what GetResponse can do for you.
In just a few minutes, you can create your first campaign and start building your list. Here is a step-by-step guide to getting started with GetResponse and sending your first email campaign:

How To Setup Getresponse and Send Your First Email Campaign
Total Time: 10 minutes
Step 1: Create a Getresponse account and configure your settings
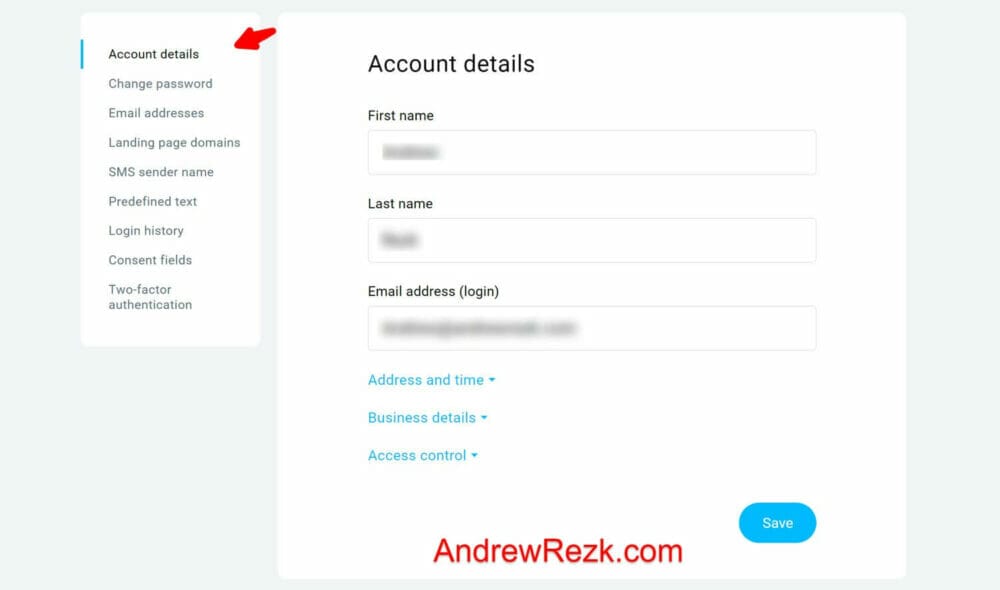
You can use Getresponse absolutely free, simply sign up for the Getresponse Free-forever plan and fill out the required information. You’ll need to provide your name, email address, and password. Once you’ve created your account, you can log in and start configuring your settings.
To configure your settings, click on the ‘Profile’ icon and select ‘Manage Account’. Here, you can adjust things such as your account details, time zone, landing page domains, SMS sender name, and consent fields.
You can set your sender email address (the email that will be used to send out your emails via Getresponse) and will be visible to your recipients. Also, you can set your business address (this is the address that will be added automatically to the footer of your emails to comply with the CAN-SPAM Act).
Lastly, you can enable two-factor authentication to protect your account from unauthorized access. After you have made the necessary changes, be sure to click “Save Changes” at the bottom of the page.
Add your billing information
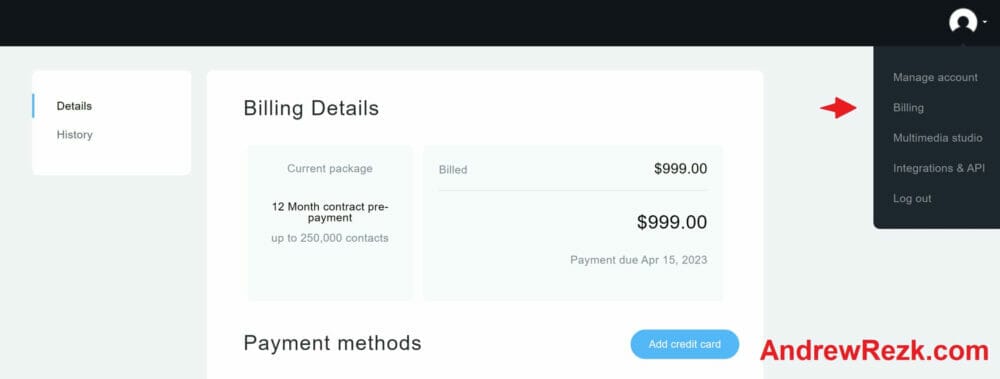
In the ‘Billing’ tab, you can update your payment method and view your invoices.
Add users to your team and configure their roles

In the ‘Accounts and users’ tab, you can manage your team by adding users and roles as well as configuring things users can do in this role (their access level). If you do not wish to add more users to your team you can skip this step.
Step 2: Import your contact lists
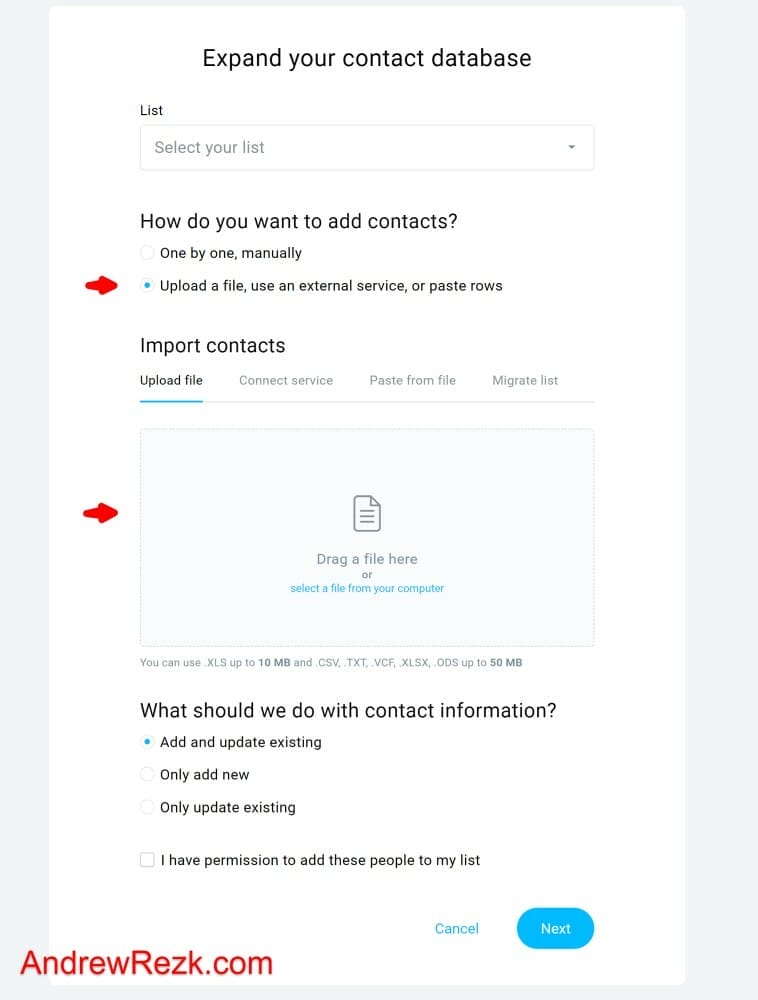
There are three ways to import your contacts into Getresponse. The first is to import them from a file, and the second is to import them from another email marketing platform (like Activecampaign or Aweber) or service (like Google Docs or Salesforce). The third option is to add contacts one by one, manually.
Option 1: Importing contacts from a file
To import your contacts from a file, you’ll need to export them from your current email service as a CSV file. Then, you can upload the CSV file to Getresponse and it will automatically import your contacts.
Note: Getresponse supports the following file types: .XLS up to 10 MB and .CSV, .TXT, .VCF, .XLSX, .ODS up to 50 MB.
Once you have exported your contacts list into a CSV file, follow these steps to import them into Getresponse:
1. Log into your Getresponse account and click on the Contacts tab.
2. Click on the ‘Add Contacts’ button, and select “Upload a file” under “How do you want to add contacts”?
3. Select the CSV file you wish to upload, then click Open.
4. Map the fields in your CSV file to the corresponding fields in Getresponse.
5. Select whether you want to import all contacts or only those who are not already on your list.
6. Click Import and wait for the process to finish. Depending on your list size, you may need to wait a few minutes until the import is complete.
Option 2: Importing contacts from another email marketing platform or service
To import your contacts from another email marketing platform or service, you’ll need to set up a connection between Getresponse and that service then you can easily import your contacts from that service. You can also migrate your list from another email marketing platform like AWeber or Activecampaign directly into Getresponse.
Currently, you can import contacts by importing Getresponse to these services: Zendesk, Highrise, Magento, Salesforce, Google Docs, Google Contacts, Formstack, and FreshBooks.
Additionally, Getresponse supports the following sources for list migration: ActiveCampaign, AWeber, MailChimp, and Constant Contact.
Option 3: Adding contacts manually one-by-one
There are a few reasons you might want to add contacts manually one by one rather than importing them from a file or list. Maybe you only have a handful of contacts, or maybe you want to take the time to personalize each contact’s information before adding them all at once. Either way, here’s how to do it:
1. Log in to your GetResponse account and click “Contacts” in the top navigation bar.
2. Click the “Add Contact” button in the top right corner.
3. Under “How do you want to add contacts?”, select “One by one, manually”.
4. Enter the contact’s information (Name and email address) in the fields that appear.
5. If you wish, you can also assign custom fields to the contact by clicking on “Assign custom field” and selecting from one of your custom fields, for example, “Company”, “Address”, “Phone number, ..etc
6. Click Save changes when you’re finished.
7. Repeat steps 3-4 for each additional contact you want to add.
Manage contact lists and segments

Under the “Contacts” > “Lists” tab, you can add your contacts and create segments. And in the “Email marketing” tab, you can create and manage your email campaigns.
That’s all there is to it!
Step 3: Create your first marketing campaign and design a welcome email
A great marketing campaign can be the key to success for your business. It can help you reach new customers, build brand awareness, and boost sales. Creating your first marketing campaign can seem daunting, but with Getresponse it’s easy and straightforward.
With Getresponse, you can easily create beautiful email newsletters, landing pages, and autoresponders to reach your target audience. Plus, Getresponse makes it easy to track your results so you can see what’s working and what’s not.
To create the first email marketing campaign in Getresponse, follow these steps:
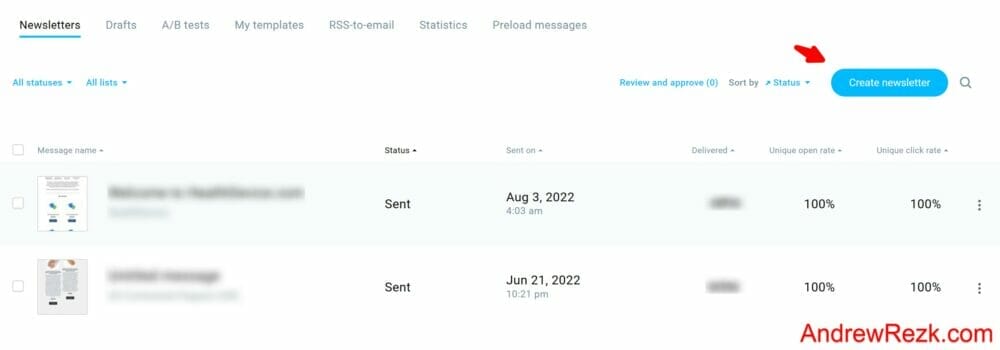
1. Log in to your Getresponse account and in the top menu click on “Tools” > “Email Marketing” > “Newsletter”.
2. Click “Create Newsletter” and select the new drag & drop email editor (recommended) or the old version of the editor.
3. Fill out the required information including your “newsletter name”, “from email address”, and “Subject line” and select “recipients” (the lists and segments that you wish to target for your newsletter campaign).
4. Click “Design message” to design your email template. Start with a template or reuse content from your existing message. You can also use the HTML editor or start with a blank layout. You can add text, images, videos, and even forms to your newsletter. When you’re finished, click “Save and Exit.”
5. Choose when would you like to send your email. You can send it immediately or schedule your email to be sent at a later time and date. Additionally, you can enable the “Perfect timing” feature to let GetResponse send your email at the perfect time for each recipient. GetResponse determines this automatically by looking at when each recipient opened your messages in the past and delivering your email when they’re most likely to open it.
6. Finally, you can click “Send message” to send your newsletter. You can also save your message as a draft to send it later.
Step 4: Send a newsletter campaign to the lists you’ve imported with GetResponse

Sending a newsletter campaign with GetResponse is easy and only takes a few minutes. Here’s how to do it:
1. Log in to your Getresponse account and in the top menu click on “Tools” > “Email Marketing” > “Newsletter”.
2. You can re-use one of your previously created Newsletters or create a new newsletter. To send one of your newsletters simply hover on it, then click on the three dots on the right-hand side and choose ‘Re-use”.
3. To create a newsletter, click on “Create Newsletter” and select the new drag & drop email editor (recommended) or the old version of the editor.
4. Add the content for your newsletter, including text, images, video, and links.
5. Enter your newsletter details, including the “subject line”, “newsletter name”, “from email address”, and “reply-to address”, then select “recipients” (the lists and segments that you wish to target).
Choose when you would like to send your email

1. Choose when would you like to send your email. You can send it immediately or schedule your email to be sent at a later time and date.
2. Preview your newsletter to make sure it looks the way you want it to. You can also send a test message to yourself.
3. Click “Send message” to send your newsletter campaign!
Side notes:
Your email list is one of your most precious marketing assets. So when it comes time to send a newsletter campaign, you want to make sure you’re doing everything right. Here are a few additional tips to help you get the most out of your next newsletter campaign:
1. Make sure your subject line is compelling and clear. The subject line is the first thing people will see, so it’s important to make a good impression.
2. Keep your content relevant and interesting. No one wants to read a boring newsletter, so make sure your content is engaging and useful.
3. Use images and videos to break up the text and add visual interest. People are more likely to engage with an email that includes visuals.
4. Use call-to-actions throughout your email to encourage people to take action.
Step 5: Create a Getresponse Signup form or Pop-up
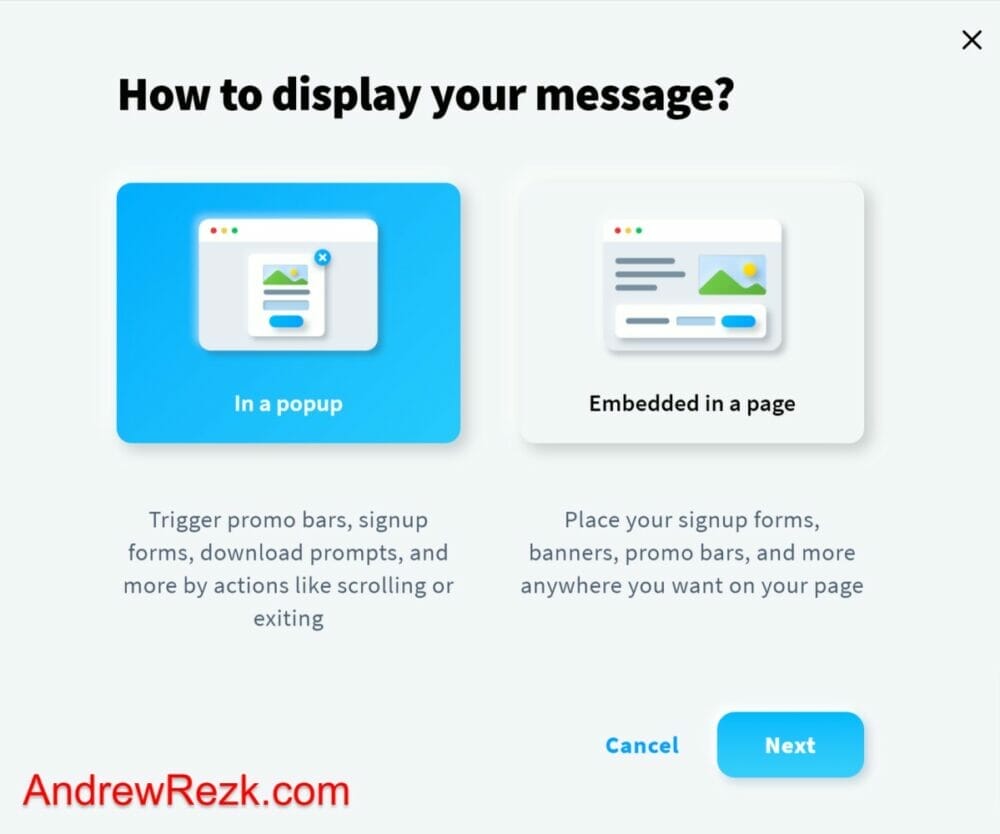
Getresponse signup forms are a great way to collect leads or signups for your newsletter. You can create professional-looking signup forms and pop-ups in just a few minutes. Plus, Getresponse forms are mobile-friendly and responsive, so they’ll look great on any device.
Here’s how to create a signup form or pop-up in Getresponse:
1. In the main menu, click on “Tools” > “Forms and pop-ups”. Choose how to display your form (in a popup or Embedded on a page).
2. Choose one of the predesigned web form templates.
3. Customize your web form content and your thank you message. Be sure to include all the fields you need in order to capture the information you need from your visitors.
4. Give your form a name and choose where to display your form on your website (display on the entire website or specific pages), and publish your changes.
5. Embed the form code on your website using code snippet or via the Getresponse plugin if you are using WordPress.
Step 6: Create a marketing automation workflow
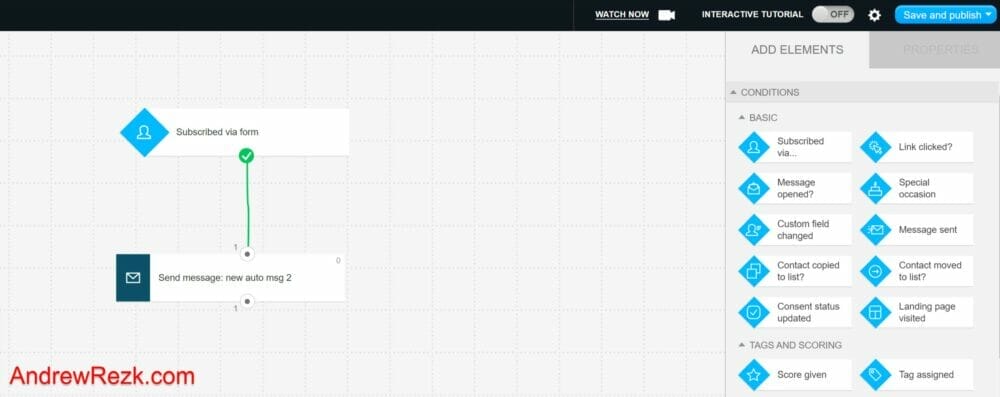
If you’re new to marketing automation, the process can seem daunting. But with Getresponse’s easy-to-use workflow builder, you can create a sophisticated marketing automation campaign in no time. Marketing automation is crucial to help you automate your marketing for your new and existing prospects without having to send emails manually.
Here’s how to create a marketing automation workflow:
1. First, decide what would trigger your automation workflow. Do you want people to receive your email when they signup to a list? Register for a webinar? or Make a purchase?. A Trigger can be “a form subscription”, “Purchase made”, “Link Clicked”, “Message Sent”..etc. These are just a few examples of triggers that you can use in the Getresponse automation workflows.
2. Second, decide what action you want to take when your prospects meet the trigger conditions. For example, when people subscribe to your list (trigger), send them a welcome email (action).
3. To create the workflow, go to “Automation” and click “Create Workflow”.
4. Select whether you want to use one of the predesigned workflow templates or create a new one from scratch.
5. Add your trigger (for example “Subscribe to a list”) by selecting from the available triggers in the drag-and-drop workflow builder. And select the list that we created in Step 2.
6. Select your action (for example “Send a message”) by selecting from the available actions on the drag-and-drop workflow builder. And select the email that we created in Step 3.
7. Connect the trigger and action blocks by dragging and dropping the connecting lines on the workflow builder.
8. Click “Save and Publish”. Your workflow is now ready, make sure you test it to ensure that it was set up correctly.
Step 7: Check your email reports, track results, and improve your campaigns
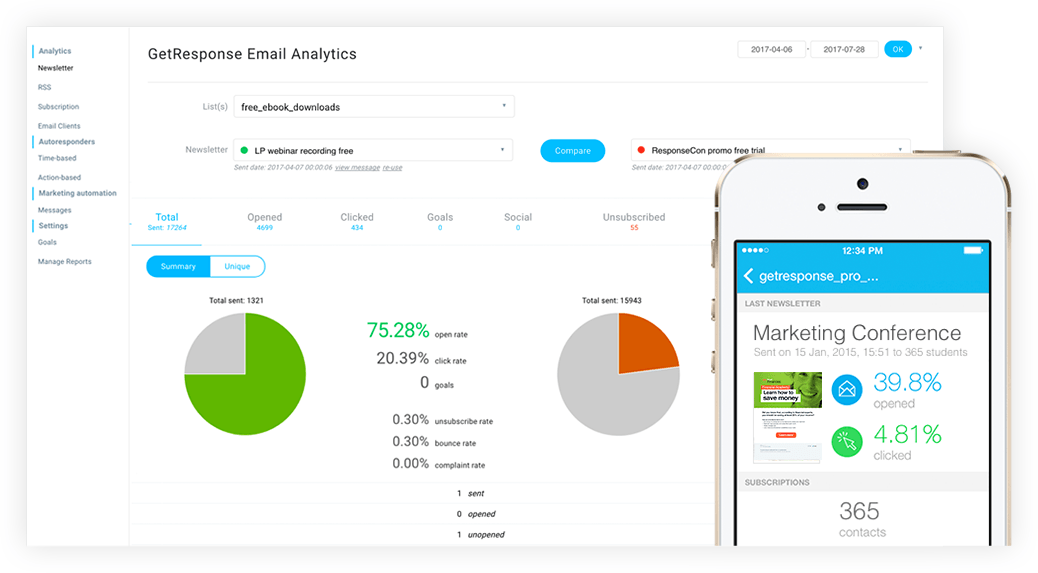
Email campaigns can be a great way to connect with your audience and promote your product or service. However, it’s important to track the results of your campaigns so you can improve them over time.
1. To check your email reports and analytics in Getresponse, follow these steps:
Go to the “Reports” tab at the top menu.
2. To check the report for your newsletter campaigns, click on “Newsletter”. And to check the report for your Automation workflow messages, click on “Automation messages”.
3. You will be shown a list of all the email campaigns you’ve sent out through Getresponse. Select the one you want to check the report for.
4. Once you’re on the campaign’s page, check the “General performance” section. Here, you can see how many people received, opened, and clicked through your email campaign.
5. If you want more detailed information, click on the “Opens” or “Clicks” links. These will show you when people opened or clicked on links in your email, respectively.
6. Check your email reports regularly to see how many people opened and clicked through your links.
7. Track your results and optimize your campaigns accordingly. Adjust your campaigns based on what you see in the reports. For example, you can try different subject lines, calls to action or even different offer types to see what works best for your audience.
Estimated Cost: 0.00 USD
Tools:
- Getresponse account
Conclusion:
In conclusion, GetResponse is a great tool for small businesses to get started with email marketing. It is user-friendly, has a wide range of features, and is affordable. GetResponse makes it easy to create beautiful emails, automate your marketing, and track your results.
Sign up for a free trial today to see how GetResponse can help you grow your business. Alternatively, you can get started using the free-forever plan.
Try Getresponse For Free
GetResponse has a large variety of features, including A/B testing, autoresponders, landing pages, and segmentation. It has one of the best free trials on the market. Sign up for a free-forever account and see what GetResponse can do for you.
Getresponse FAQs:
Can I really use Getresponse for free?
Yes, you can use Getresponse for free. You can either sign up for a free-forever account which allows you to use Getresponse for free forever and send unlimited emails to up to 500 subscribers, or you can sign up for a free trial of a paid plan to unlock more features and tools for 30 days. Getresponse has one of the best free trials available on the market. I recommend you start with a free trial plan to test all the marketing tools in Getresponse and see if it is right for you. You can always scale up your plan as your business grows.
Does Getresponse have good email deliverability?
Yes, Getresponse has good email deliverability. However, there are some factors that can affect deliverability, such as the size of your list, the quality of your list, and your sending reputation. If you have a large list with a high percentage of bounces or complaints, your deliverability will suffer. Likewise, if you have a small list and a good sending reputation, your deliverability will be good.
Getresponse has an email deliverability rate of around 98%, which is great. However, keep in mind that there are some factors that can affect deliverability, such as the size of your list, the quality of your list, and your sending reputation. If you have a large list with a high percentage of bounces or complaints, your deliverability will suffer. Likewise, if you have a small list and a good sending reputation, your deliverability will be good.
Also, Getresponse makes it easy to determine if your email will likely end up in the spam folder because it has a Spam Check filter to check your emails before sending them out. Additionally, Getresponse offers a dedicated IP address for their high-tier plan if you have a high sending volume and you’d like to improve your email deliverability further.
Overall, Getresponse offers free tools in all plans like A/B testing for subject lines, A/B tests for email content, and Spam checks to help you improve email deliverability, email open rates, and click-through rates. Unlike its competitors, which don’t usually offer these tools for free.
Where do I get started with Getresponse?
There are a few different ways to get started with Getresponse. You can either sign up for a free-forever account which allows you to use Getresponse for free and send unlimited emails to up to 500 subscribers, or you can sign up for a free trial of a Getresponse plan to unlock more features and tools for 30 days.
Getresponse has one of the best free trials on the market. I recommend you start with a free trial plan to test all the marketing tools in Getresponse. If you’re not sure which one is right for you, you can always contact Getresponse support to help you decide. They have a great onboarding process and helpful support 24/7 via live chat and email.
How can I add contacts to my lists?
There are a few ways to add contacts to your lists in Getresponse. You can manually add them one by one, or you can import them from a file. If you have a large number of contacts, you can use a contact management service to add them to your lists. Click here for step-by-step instructions.
What is a Getresponse Newsletter?
A Getresponse Newsletter can be defined as an email marketing tool that helps businesses send out newsletters, promotional emails, and other types of email campaigns. Newsletter typically contains information about new products, services, or promotions that are offered by the company. Getresponse Newsletters can also include coupons, discounts, or other special offers.
What is a Getresponse Autoresponder?
A Getresponse Autoresponder is an email marketing tool that allows you to automatically send a series of emails to your subscribers. This can be used to nurture your leads, build relationships, and ultimately sell your products or services.
What is the difference between Getresponse’s Newsletters and Autoresponders?
In general, autoresponders are a more versatile tool than newsletters when it comes to email marketing. Newsletters tend to be more focused on giving readers timely information about a specific topic, while autoresponders can be used to send a series of emails that build relationships with subscribers and eventually lead to conversions. Autoresponders also give you more control over the timing and content of your messages.
How do I create a Getresponse Newsletter?
There are a few simple steps to creating a Getresponse Newsletter. First, you need to create a list of contacts that you want to include in your newsletter. Next, you need to create a template for your newsletter. Once you have created your template, you can then add your content to the template and then send your newsletter to your contacts. It only takes a few clicks to do that in Getresponse. You can send your newsletter immediately or schedule it to be sent at a later date and time.
How do I create a Getresponse Autoresponder?
To create an autoresponder in Getresponse, simply log into your account and click on the ‘Autoresponders’ tab. From there, you can click on the ‘Create Autoresponder’ button to begin creating your message. You will be prompted to enter a name for your autoresponder, as well as the subject line, sender name, reply-to email address, and message body. Once you have entered all of the necessary information, simply click on the ‘Save’ button to create your autoresponder.
Your autoresponder will be saved on the Getresponse calendar and it will be sent out automatically. You can create more autoresponder emails over a specific period of time to have a series of emails going out to your subscribers.
Does Getresponse have A/B testing?
Yes, Getresponse has A/B testing for email subject lines and email content. This means that you can test different versions of subject lines and email content to see which one performs best. This is a valuable tool that will help you optimize email marketing campaigns and increase your email open and click-through rates.


